Awesome Expression > Sims 1 > Sims 1 Tutorials > Custom Animation Tutorial - Part 2
Sims 1 Custom Animation Tutorial - Part 2
|
Make a new animation with the poses
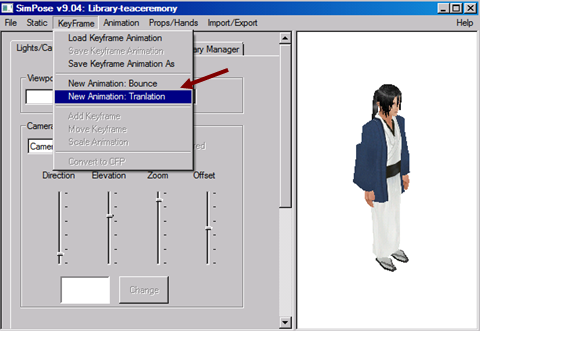
1. This is even more fun! To start a new animation, go to Keyframe > New animation. I typically choose “translation”, but you can also choose “bounce” for a mirror animation sequence.
1. This is even more fun! To start a new animation, go to Keyframe > New animation. I typically choose “translation”, but you can also choose “bounce” for a mirror animation sequence.
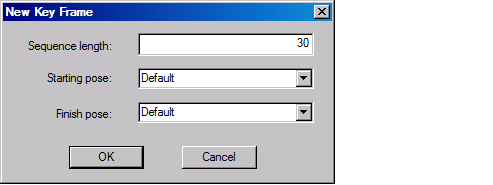
Now choose the animation settings in the pop-out menu:
- Sequence length > start with 30-100 frames/second (just to give you a working number to space out pose intervals)
- Start and finish pose: often Default for seamless transition
- You will see that the Sim model is not moving – because it is going from the default pose to default pose! You add keyframes (poses) to the animation to see movement.
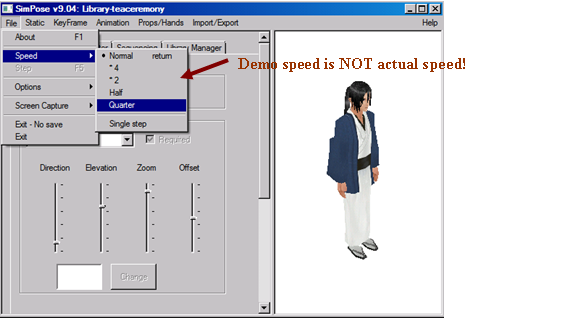
*you can actually go to File > Speed, and change the demo speed. This temporarily changes the view speed, but does not represent the true speed. Remember to change back to “normal” speed to get an idea of the true speed before you finalize the animation. You can scale the actual speed at any time (see #8).
2. Take a minute to plan your ROUGH animation sequence. Say you have 5 poses and you want them to go evenly from one to the other. For an animation with 30 frames/second, you can set them at 0 (default pose), 5 (pose 1), 10 (pose 2), 15 (pose 3), 20 (pose 4), 25 (pose 5), 30 (default). This is just an example: they do not necessarily have to be evenly apart. You can fine tune later.
* You do NOT have to be mathematical! You will get a much better idea when you see the actual demo animation! You can always start over by clicking a button!
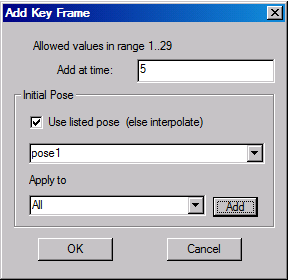
3. Now start adding keyframes to the animation: go to Keyframe > add keyframe
4. For pose 1 of this example, add at time = 5 > Check “use listed pose” > select your pose of choice (pose 1 in this case)
5. See how the model now moves smoothly from default to pose 1? Pure magic! Okay moving the left arm up and down repeatedly is actually kinda boring, BUT this is a start to an awesome animation sequence! Remember you can move multiple joints in the same pose!
6. Go
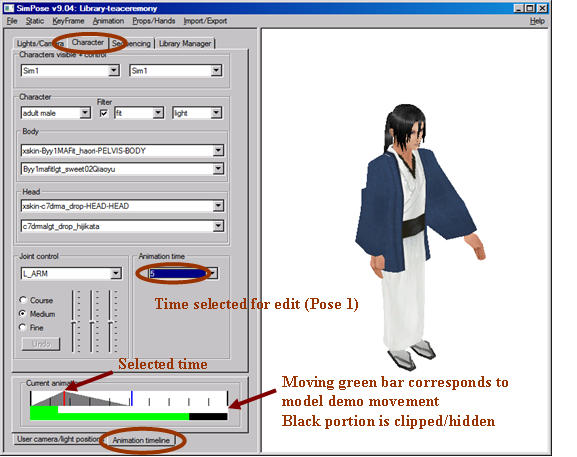
to character tab > animation timeline (bottom tab). This allows you to view
the moving timeline as the model moves.
- the blue vertical lines are the keyframes you added.
- clicking on a vertical bar will make it red – this is the selected time that you can “move”. Say you want to move pose 1 from time 5 to 10, you can click on it to make it red, then go to Keyframe > move keyframe > change the number to 10.
- The lower green bar is a clipping bar – clicking on it allows you to trim parts of an animation (blackened sections will be hidden)
7. Keep adding other poses as keyframes. You will start to see your animation coming together in the demo! What a magical feeling!
*To make your life difficult, sometimes Simpose suddenly throw in your start pose in the middle for no reason. No kidding! When this happens, track down this annoying additional frame in the moving timeline. Click on that annoying vertical line, go to Keyframe > Move keyframe, and move it to the beginning (1) so that it becomes unnoticeable. Unfortunately you cannot delete a keyframe.
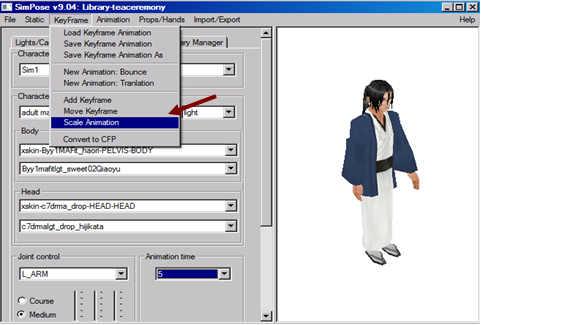
8. Animation going too fast/slow? Keyframe > scale animation > alter number to scale it proportionally. Say you initially start with 30, scaling it to 300 will make it 10x slower. My animations are usually 200-500 long.
9. ARGH! Pose-to-pose transition too fast? You can make the Sim pause briefly at each pose by adding an extra duplicate frame between poses. For example, you can do: 0 (default), 3 (pose 1), 5 (pose 1), 7 (pose 2), 10 (pose 2). The model will now pause at pose 1 for 2 units before moving to pose 2 and pausing for 3 units.
Saving the Animation
Like/LOVE your awesome animation? Save it!
Like/LOVE your awesome animation? Save it!
- Keyframe > save keyframe animation as > name as filename.kfd
- Now you need to save the animation in a format read by the game. Go to Keyframe > convert to CFP
- Animation > save CFP animation as “a2o-filename.cmx” (o as in small cap alphabet “o”, not “zero”). Create files in Simpose > Gamedata > animation folder.
This is the end of Part 2! Be proud of yourself already!
Part 3 will deal with how to link an animation to an object.
Part 3 will deal with how to link an animation to an object.

